
Swd User Rom Upgrade Tool Updated !free!
SWD User ROM Upgrade Tool (also known as the Software Download Tool Transsion Aftersales Tool
) is a specialized utility used primarily for flashing stock firmware, custom ROMs, and recovery images on Android devices. It is frequently associated with MediaTek (MTK) Spreadtrum (SPD) chipsets used in brands like Tecno, Infinix, and Itel. Core Features
The tool is designed for system maintenance and device recovery, offering the following capabilities: Firmware Flashing : Supports flashing firmware in both scatter format (common for MediaTek) and bin format Device Revival
: Used to fix "bricked" devices, resolve boot loops, and perform factory resets. Checksum Verification
: By default, it uses a checksum file to verify firmware integrity before flashing to prevent device damage. Flexible Flash Options : Includes modes such as " download only reserve data
," which attempts to preserve user data during a firmware update. GUI-Based Interface
: Provides a graphical user interface for loading scatter files and monitoring flashing progress. Updated Requirements & Setup
To use the latest versions of the SWD Tool, the following environment setup is critical: Driver Installation : Requires the installation of MediaTek USB Vcom SPD drivers depending on the device chipset. OS Compatibility
: Latest updates are compatible with Windows and sometimes Linux. On Windows, it is often necessary to disable driver signature verification before installing the required drivers. Checksum Overrides
: In recent updates, advanced users can disable integrity checks by editing the common_setting
file in the config folder (changing checksum values from 1 to 0) to bypass verification if a checksum file is missing. Flashing Procedure : Run the application from the extracted tool folder. Load Firmware : Click the setting/load icon and select the Android_scatter.txt file from your firmware directory. Initiate Flashing : Click the green play/start icon . The icon will change to a red stop sign. Connect Device
: Power off the device and connect it to the PC via USB. For some chipsets, you may need to hold the Volume Down key during connection. Completion : Wait for the " " message or a green circle to appear before disconnecting. SWD® Update Tool - ez-Wheel swd user rom upgrade tool updated
Here are a few options:
-
Brief and straightforward:
- "SWD User ROM Upgrade Tool Updated"
-
Informative and slightly detailed:
- "Important Update: SWD User ROM Upgrade Tool Now Available"
-
Detailed announcement:
- "We are pleased to announce that the SWD User ROM Upgrade Tool has been updated. This tool is essential for users looking to upgrade their device's ROM efficiently and safely. The update includes improvements in stability, speed, and compatibility with various devices. Users are encouraged to download the latest version to ensure a seamless upgrade experience."
-
Technical and informative:
- "SWD User ROM Upgrade Tool Updated: Enhancements Include Improved Flashing Speed, Enhanced Device Compatibility, and Better Error Handling. Recommended for All Users."
-
Short and catchy:
- "Upgrade Smarter: SWD User ROM Tool Updated!"
-
Official and comprehensive:
- "Official Update: SWD User ROM Upgrade Tool Version [X] Released. This update addresses previous issues, improves performance, and adds support for new devices. Users can download the updated tool from our official website and follow the provided instructions for a successful upgrade."
The SWD AfterSales Download Tool (often referred to as the Software Download Tool) is a specialized utility used primarily for flashing stock firmware (ROMs), custom recovery images, and fixing software issues on MediaTek (MTK) based Android devices, such as those from Tecno, Infinix, and Itel. Key Functions and Features
Firmware Flashing: Used to install or update the stock ROM on a device to resolve issues like being stuck on a logo, invalid IMEI, or network problems.
Unbricking: Capable of reviving "dead" or bricked devices by re-writing the firmware.
Format Support: Typically supports firmware in scatter format (specifically MTxxxx_Android_scatter.txt) or occasionally .bin formats. SWD User ROM Upgrade Tool (also known as
Checksum Verification: By default, the tool verifies the integrity of the firmware files. This can be disabled if necessary by editing the common setting file in the tool's config folder. How to Use the Updated SWD Tool
The general workflow for using the tool involves these steps:
Preparation: Download the tool and the correct stock firmware for your specific device model.
Driver Installation: Ensure MediaTek USB Vcom drivers are installed on your PC so the computer can detect the device in its powered-off state.
Loading Firmware: Open swd.exe, click the settings icon, and navigate to your firmware folder to load the scatter file.
Flash Settings: Choose an option like "firmware upgrade" or "download only reserve data" depending on whether you want to preserve user data.
Flashing: Click the green "Play" icon. Power off your phone completely and connect it to the PC via USB. Flashing starts automatically once the device is detected.
Completion: A "Pass" message indicates the process is successful. Disconnect the device and power it on. Safety Warnings
Backup Data: Flashing can wipe all user data; ensure you have a backup.
Avoid Interruption: Interrupting the process (e.g., unplugging the cable) can permanently damage (hard-brick) the device.
Preloader Warning: Some experts recommend unticking the "preloader" file in the tool to avoid permanently breaking the device if the firmware is slightly incorrect. How to use Software Download (Transsion Aftersale) tool Brief and straightforward:
Here’s a clean, professional post you can use on forums (like XDA), social media, or a blog:
Title: SWD User ROM Upgrade Tool Updated – Smoother Flashing, Better Reliability
Body:
A new version of the SWD User ROM Upgrade Tool has just been released, bringing several key improvements for users who flash custom or stock ROMs on supported devices.
What’s New:
- Improved stability during large firmware transfers
- Faster ROM flashing times
- Better error handling and clearer logs
- Expanded device compatibility (check the official changelog for your model)
- UI tweaks for easier navigation
Why Update? If you’re still using an older build of the SWD tool, upgrading is highly recommended. The latest version reduces the risk of incomplete flashes and improves device recognition, especially on newer Windows builds.
Download & Changelog: [Insert official download link or source]
Pro Tip:
Always back up your current ROM and user data before upgrading or flashing. Use a genuine USB cable and avoid interrupting the process.
Have you tried the new version? Share your experience below.
How to Perform an Upgrade (Updated Workflow)
Introduction
The SWD (Serial Wire Debug) User ROM Upgrade Tool has received a significant update, bringing enhanced stability, faster programming speeds, and improved error handling for embedded systems engineers. This tool remains the industry standard for in-system programming of user ROM sections on ARM Cortex-M based microcontrollers without requiring a full chip erase.
Common flags to expect (examples)
- --adapter
- --port
- --probe
- --read / --write / --verify / --erase
- --address / --length
- --backup / --restore
- --no-reset / --reset / --auto-reset
- --verbose / --quiet
Typical workflow (CLI-focused)
- Connect adapter to PC and target.
- Confirm adapter recognized:
- tool --list-adapters (or GUI-equivalent)
- Probe target and read device ID:
- tool --probe
- Optional: read and back up current ROM:
- tool --read 0x00000000 --length
--out backup.bin
- tool --read 0x00000000 --length
- Erase or prepare flash (full/sector):
- tool --erase --all OR tool --erase --sectors addr:size
- Flash new ROM:
- tool --write new_firmware.bin --address 0x00000000
- Verify write:
- tool --verify new_firmware.bin --address 0x00000000
- Reset and run:
- tool --reset --run
- Check logs/output for success codes and any CRC/MD5 confirmation.


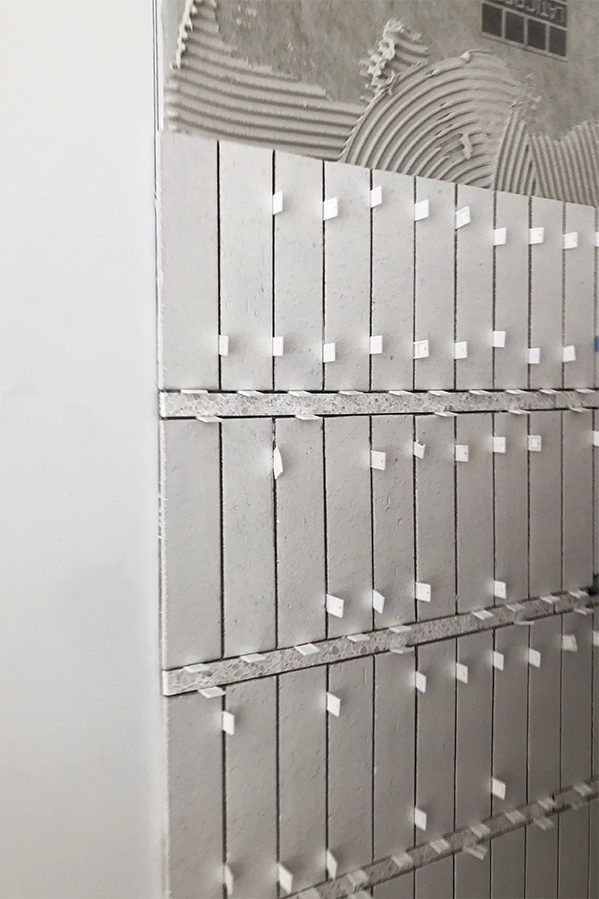
Never will there be a fancier temporary spacer than terrazzo- ha! It looks absolutely stunning.
haha right?!
I had been wondering how that thick grout line would hold up as most sanded grouts say max 1/2”! Thank you for sharing! It’s beautiful!!
Love it. I want to see your vanity! Also, are your terrazzo floors matte or glossy finish? X
I second this!! I actually came on here hoping we’d get a little morsel on the custom concrete vanity/sink. But perhaps she’s been giving it time just like this tile install before sharing.
Thank you for sharing! It turned out fabulous and I appreciate you wanting to make sure it held up well.
Hi sarah,
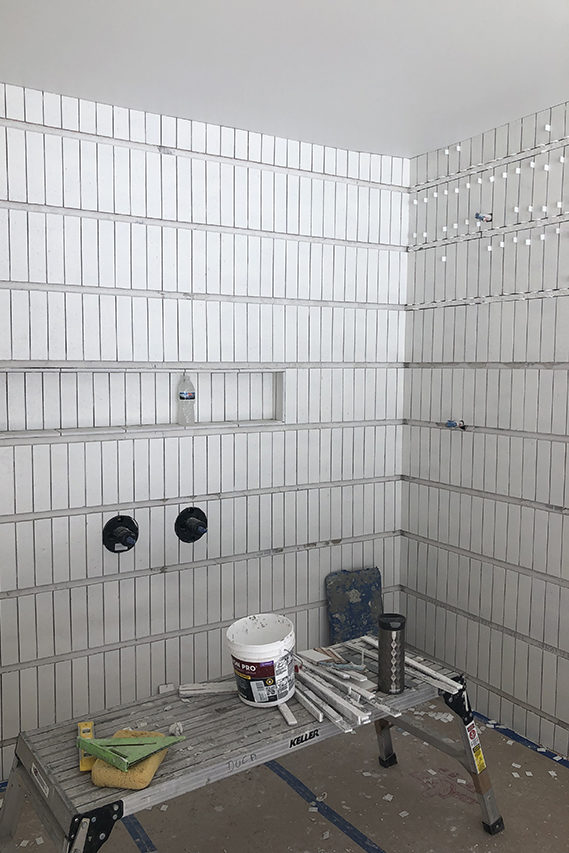
That tile is so beautiful! I want to do something similar in my shower but worried the thick grout will start to show cracks after awhile. Did you seal the grout in yours?
What mirror is that? I have been looking for a similar mirror? Is the mirror backlit?
Did you have to fill in the 1″ area of grout enough to cover the top and bottom of the tiles?
[…] matte white on the walls and the Natural Zellige on the floor. Read all about how we executed the wall tile treatment here. I designed the custom concrete vanity with an integrated sink and had it fabricated […]
I am curious if you could give any insight into how the application of the grout was done. How did you keep the one inch grout line looking smooth while also making sure to remove any grit haze from the tile? I would be afraid that as I wipe the grout off the tile face that I would mess up the finish of the thick grout line. I really want to try this but it makes me nervous!
Did you use a schluter tile edge strip where the tile transi to REGULAR wall?
Hi Gina!
No, Cle offered glazed trim tile so it looks like an edge so no need for a schluter.